What is Minimal API?
.NET Core Minimal API was introduced with .NET 6 to simplify creating focused APIs. These APIs reduce setup complexity by fluently declaring routes and actions, bypassing traditional scaffolding and controller overhead.
While conventional API setup involves controllers, routes, and middleware, Minimal APIs use concise syntax. They accommodate scaling, handling complex routing, authorization, and content control.
Core features include:
- Simplicity: Syntax is concise, reducing setup compared to MVC-based APIs.
- No Controllers: Avoid separate controllers; declare routes and handlers directly.
- Single File: Suitable for small APIs, fit the entire API within a single file.
- Inline Configuration: Define configuration inline for intuitive setup.
- Convention-Based: Reduce explicit configuration needs.
Advantages:
- Simplicity: Readable syntax aids understanding.
- Reduced Boilerplate: Less code, quicker development.
- Inline Configuration: Intuitive settings, simple scenarios.
- Single File: Manageable for small projects and prototypes.
- Quick Prototyping: Ideal for fast microservices development.
Disadvantages:
- Limited Flexibility: May not suit complex projects if not well designed.
- Scalability and Maintainability: Better for simple cases.
- Testing and Separation: Effort needed for concerns separation.
- Learning Curve: Adaptation for experienced developers.
Now, let’s understand Minimal API with a practical TODO list example
Building a Todo List API with .NET Core Minimal APIs: A Step-by-Step Guide
Are you ready to dive into the world of API development using the power of .NET Core Minimal APIs? In this comprehensive guide, we’ll go through the process of building a Todo List API from scratch. By the end, you’ll have a clear understanding of each step and how Minimal APIs can streamline your development process.
Step 1: Get Started with a New .NET Core Project
Creating a Minimal API using Command Prompt
To kick things off, let’s create a new .NET Core project named “TodoApi” using the command-line interface:
dotnet new web -n TodoApi
This simple command sets up the foundation for our Todo List API project.
We can even create a new project using Visual Studio by following below steps.
Creating a Minimal API with Visual Studio: Step-by-Step Guide
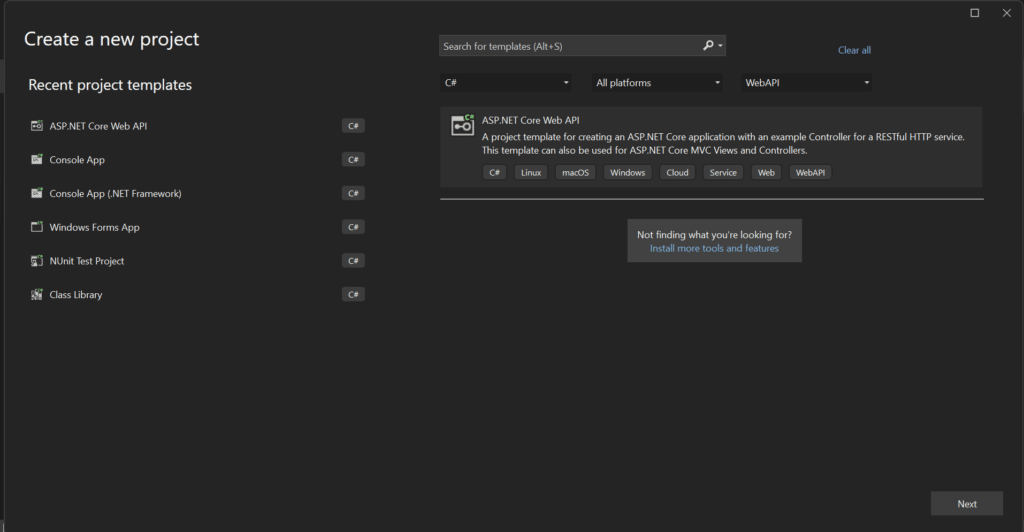
- Open Visual Studio and click on “Create a New Project”
- Select “ASP.NET Core Web API” project templete as shown below and click on Next
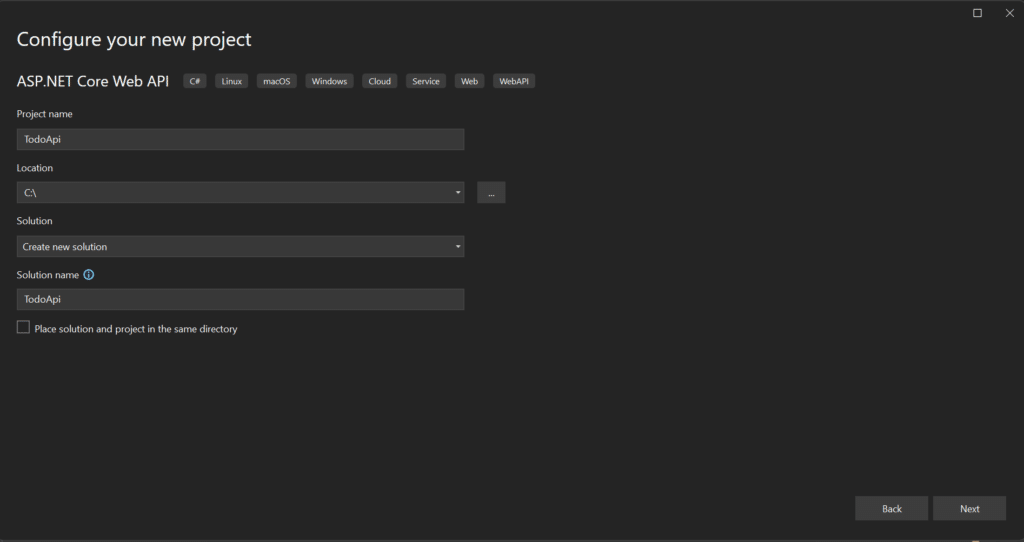
- Enter a project name, choose a location, and click “Create.”
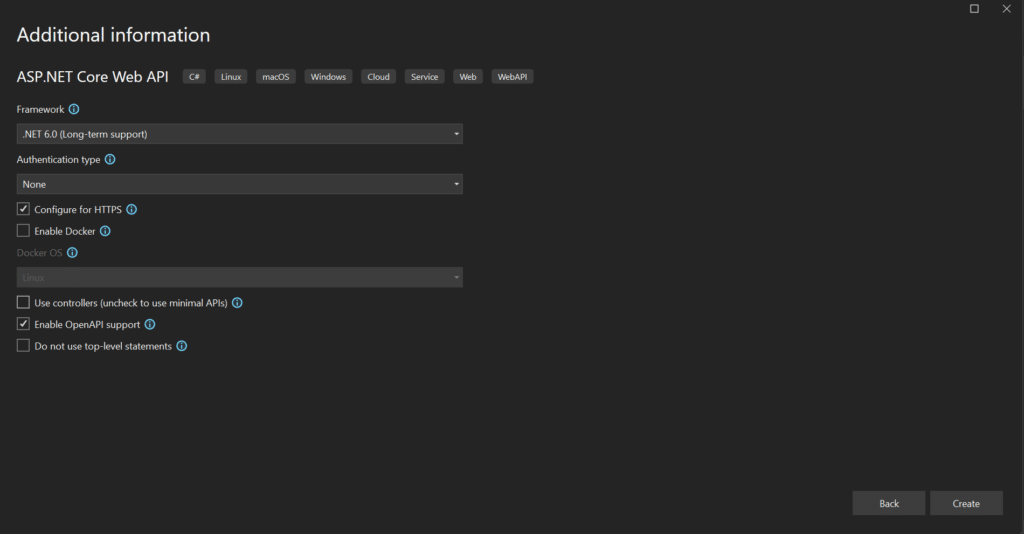
- In the next screen, we configure the Minimal API. Choose options such as HTTPS, OpenAPI support. Make sure to uncheck “Use Controllers (uncheck ro use minimal APIs)”. Click on Create.
Step 2: Navigate to the Minimal API Project Directory
Navigate to the project directory just created:
cd TodoApi
Step 3: Define Your Todo Model
Create Models folder within the project and create a file named Todo.cs. This is where you’ll define the structure of your todo items:
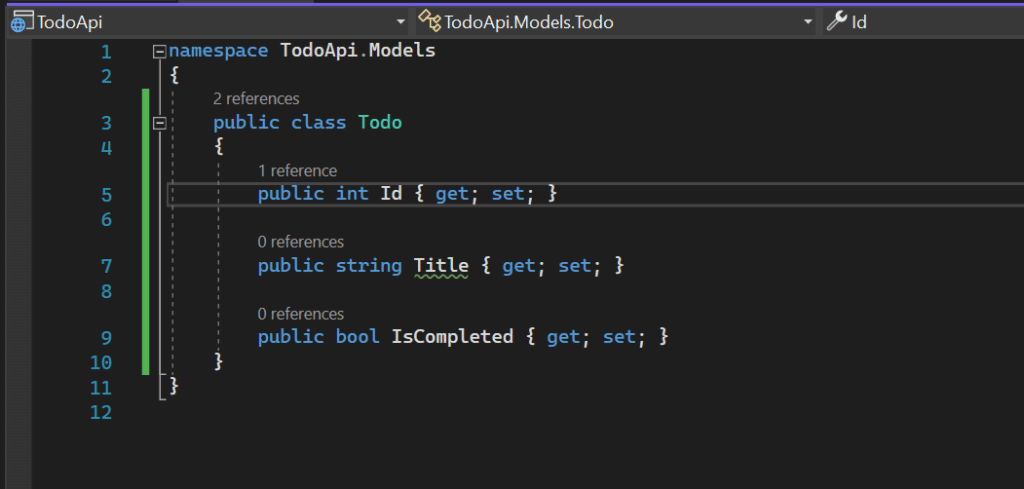
Todo model will hold essential information about each todo task, including an Id, Title, and IsCompleted flag.
Step 4: Create the Minimal API
Open the Program.cs file and add the following code before app.Run():
//Todo List Code
var todos = new List();
int nextId = 1;
// GET endpoint to retrieve the list of todos
app.MapGet(“/todos”, () => todos);
// POST endpoint to add a new todo
app.MapPost(“/todos”, (Todo todo) => {
todo.Id = nextId++;
todos.Add(todo);
return todo;
});
// PUT endpoint to update an existing todo
app.MapPut(“/todos/{id}”, (int id, Todo updatedTodo) => {
// Find the existing todo with the provided ID
var existingTodo = todos.FirstOrDefault(t => t.Id == id);
if (existingTodo != null)
{
// Update the title and completion status with the new values
existingTodo.Title = updatedTodo.Title;
existingTodo.IsCompleted = updatedTodo.IsCompleted;
return Results.Ok(existingTodo);
}
return Results.NotFound();// Return “Not Found” if the todo doesn’t exist
});
// DELETE endpoint to remove a todo
app.MapDelete(“/todos/{id}”, (int id) => {
// Find the todo to remove based on the provided ID
var todoToRemove = todos.FirstOrDefault(t => t.Id == id);
if (todoToRemove != null)
{
    todos.Remove(todoToRemove); // Remove the todo from the list
    return Results.Ok(); // Return "Ok" to indicate success
}

return Results.NotFound(); // Return "Not Found" if the todo doesn't exist
});
Let’s break it down:
WebApplication.CreateBuilderinitializes a builder for the web application.builder.Build()creates your application.- We set up an empty list named
todosto hold your todo items. nextIdhelps manage the IDs for new todos.- We define a
GETendpoint at/todosto retrieve your list of todos.
// POST endpoint to add a new todo
app.MapPost(“/todos”, (Todo todo) => {
todo.Id = nextId++;
todos.Add(todo);
return todo;
});
In this block:
- We define a
POSTendpoint at/todosfor adding new todos. - Each new todo is assigned a unique ID and added to the
todoslist. - The newly added todo is then returned as a response.
// PUT endpoint to update an existing todo
app.MapPut(“/todos/{id}”, (int id, Todo updatedTodo) => {
// Find the existing todo with the provided ID
var existingTodo = todos.FirstOrDefault(t => t.Id == id);
if (existingTodo != null)
{
// Update the title and completion status with the new values
existingTodo.Title = updatedTodo.Title;
existingTodo.IsCompleted = updatedTodo.IsCompleted;
return Results.Ok(existingTodo);
}
return Results.NotFound();// Return “Not Found” if the todo doesn’t exist
});
Now for the PUT endpoint:
- We define a
PUTendpoint at/todos/{id}for updating existing todos. - We find the todo with the provided
idin thetodoslist. - If the todo exists, we update its
TitleandIsCompletedproperties based on the providedupdatedTodoand return the updated todo. - If the todo doesn’t exist, a “Not Found” result is returned.
// DELETE endpoint to remove a todo
app.MapDelete(“/todos/{id}”, (int id) => {
// Find the todo to remove based on the provided ID
var todoToRemove = todos.FirstOrDefault(t => t.Id == id);
if (todoToRemove != null)
{
    todos.Remove(todoToRemove); // Remove the todo from the list
    return Results.Ok(); // Return "Ok" to indicate success
}

return Results.NotFound(); // Return "Not Found" if the todo doesn't exist
});
And finally, the DELETE endpoint:
- We define a
DELETEendpoint at/todos/{id}for removing todos. - We locate the todo to remove in the
todoslist based on the providedid. - If the todo exists, we remove it from the list and return an “Ok” result to indicate success.
- If the todo doesn’t exist, a “Not Found” result is returned.
Step 5: Run Your Application
Time to see your Todo List API in action! Run the application with:
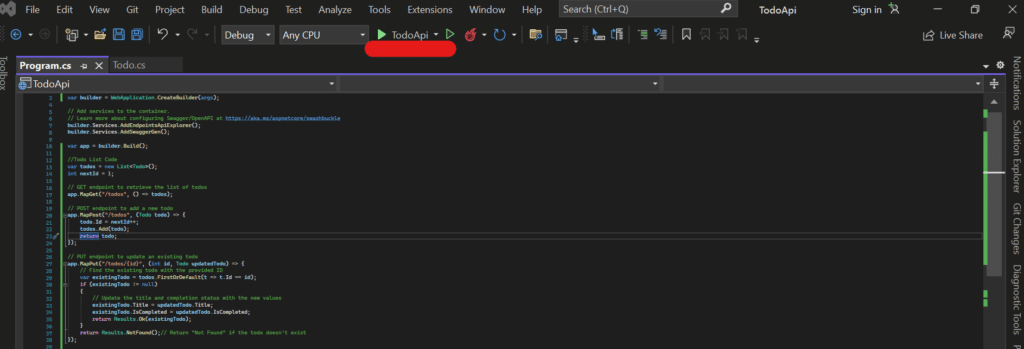
Run dotnet run in command prompt or click on TodoApi in Visual Studio as highlighted below.
Step 6: Interact with Your Todo List API
Here’s how you can interact with your Todo List API:
- GET
/todos: Retrieve the list of todos. - POST
/todos: Add a new todo. - PUT
/todos/{id}: Update an existing todo. - DELETE
/todos/{id}: Delete a todo.
Congratulations! You’ve successfully built a Todo List API using .NET Core Minimal APIs. This guide took you through the process step by step and provided sample code for each stage.
By following this comprehensive guide, you’ve unlocked the power of .NET Core Minimal APIs to create a functional Todo List API. This step-by-step journey, complete with detailed explanations and code samples, will equip you with the knowledge you need to craft your own APIs efficiently. This code can further be enhanced by adding Repositories and other functinalilties based on requirement.
If you like this post and are interested to learn more about MInimal API, please go through below links for other related posts
Minimal API Archives – Coding Tutorial (codingizfun.com)
References
https://learn.microsoft.com/en-us/aspnet/core/fundamentals/minimal-apis/overview?view=aspnetcore-7.0
https://learn.microsoft.com/en-us/aspnet/core/fundamentals/minimal-apis?view=aspnetcore-7.0
